fbpx

DSLR Camera Settings: Your Guide To Achieving The Perfect Shot

If you are a new photo boother, a budding photographer, or someone simply looking to learn how to get a great shot with your DSLR camera, you’re in the right place. At LA Photo Party, we have a combined photography experience of over 100 years, and our seasoned pros are experts at tweaking the settings to get the perfect shot. 


Mastering your DSLR is the fastest way to go from amateur photographer to consummate professional. While photo booth software like Photo Booth Upload can add incredible effects to your final image, if the subject is washed out, fuzzy, grainy, or has an improper color balance, you’ll be cutting yourself short by not knowing how to fix your image before all the bells and whistles. It would be like owning a Ferrari and filling it with bathtub gin! 


To help you get to know your DSLR better, we’ve compiled a list of terms, what they mean, and how you can use each feature to take the perfect shot before it goes through the PBU magic machine. Once you’ve mastered these, you’ll have everything you need to take the perfect shot and have your clients coming back for more. 


Understanding DSLR Camera Settings

Before we dive into Photo Booth Upload and optimizing your photo booth camera settings, let’s gather a basic understanding of  DSLR terminology. 


This foundation will help you know how to manipulate Aperture, shutter speed, and sensitivity to light. Let’s explore each of these and how they impact your picture quality. 

Aperture Value/f-stop (AV)

Aperture Value (AV) regulates how much light enters your camera. It’s not unlike how eyes dilate in different settings – the pupil gets smaller when there is lots of light in our environment and larger when there’s less light. 


AV also can impact the depth of field of an image. The wider the aperture, the more shallow your depth of field, meaning the range at which a subject will be in focus is smaller, and things outside of that range will be even more blurry. This is especially challenging if you are photographing groups of people where some are standing in front and some are behind, or any other type of photograph where you want a lot of your image to be in focus.


Values that are small, like 1.4, mean there’s a wider aperture, which mean more light but less depth of field. A larger value means a narrow aperture, less light being captured, and a larger depth of field (more things will be in focus).

A higher AV creates a small aperture, which you need if you shoot in a well-lit indoor environment with a flash. A good rule of thumb for most photo booth events is the best AV for indoor event photography ranges between 5.6 to 8.


Credit: https://fixthephoto.com/fstop-full-stop-photography.html

Shutter Speed/exposure time (Tv)

Exposure time is how long your camera’s shutter remains open. For darker environments with low light, you may need a longer exposure time to capture as much light as possible. If you have a lot of lighting, you won’t need the shutter open as long and so you can have a shorter duration. 

Shutter Speed values are measured in the length of time (usually seconds or fractions of a second). A shutter speed value of ½ means that the shutter is open for a half of a second and a shutter speed of 1/250 means that the shutter is open for only one-two-hundred-and-fiftieth of a second (much shorter).

If you’re looking to capture a lot of movement in your picture, a shorter duration is ideal. But for features like Photo Booth Upload’s Light Painting – you want to keep the shutter open the entire time you’re painting and then manually shut it with our trigger. 

For most of our events, we set our shutter speed to 1/100 and 1/60 for the best outcome. If you’re snapping away in bright conditions, increasing your burst to 1/250 will do wonders for your pictures. And for video shots with constant LED lighting, 1/60 or 1/30 works well, so choose what works for you based on the footage frame rate. 

Note: when shooting with a flash, the flash will not sync with a shutter speed faster than 1/250.

ISO (International Standards Organization)

While the International Standards Organization is the organization that sets what this setting means, they also set lots of other standards. In photography, however, the ISO refers to the sensitivity of the film or sensor to light.

ISO determines how sensitive a camera is to the light in your immediate environment. Generally, lower light conditions translate into less clear pictures. 

Fine-Tune Your Shots With Additional DSLR Settings

There are other fun ways to help make your photos look even better. The following are some of the most effective settings to adjust for the best picture quality:

White Balance

White balance is used to create more accurate colors in your image by compensating for the color temperature of the lights in your scene.  Outdoor lighting tends to be more blue, whereas incandescent bulbs are more orange.  Many professional photography lights can adjust their color temperature along this range from blue to orange, and most cameras can do this automatically or by setting the value to specific color temperature numbers or to pre-defined environment settings (such as cloudy, direct sunlight, flash, or fluorescent).  Keep in mind that automatic settings can be affected by large areas of a single color in your scene (like a greenscreen or the colors of people’s clothing), and some cameras are not as good at automatically detecting the scene’s color temperature as others.  When doing green screen keying, it is always best to set the color temperature manually, as automatic settings can cause the color of the green to vary from image to image, which can mess up the computer’s ability to key the image cleanly.
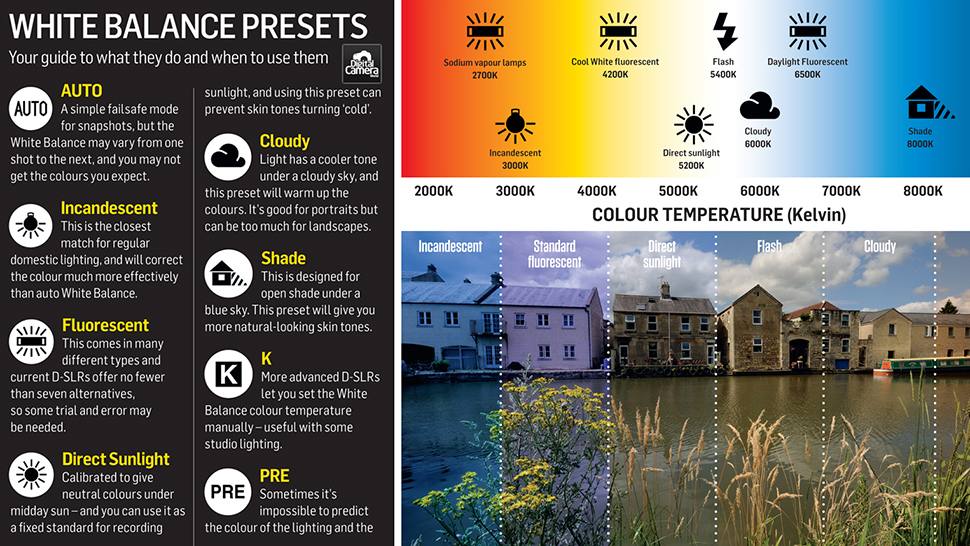
Credit: https://www.digitalcameraworld.com/tutorials/cheat-sheet-white-balance-settings


Image quality

The beauty of DSLR is that you can easily tailor image quality to suit your needs. Middle Fine jpeg works very well for most scenarios because these photos are meant to be printed at small scale, almost never larger than 8×10, and viewed on phones and computers where massive resolutions do not add to the quality of the image but do add to the required upload/download times, data usage, and storage requirements.

DSLR video settings 

With DSLR, opting for frame rate and pixel dimensions for specific situations is also easy. This means you can decide how detailed you would like your videos to appear.


720×1280 at 30 fps is better for longer videos as it reduces the file size and usually, also the processing time and 60 fps is just not necessary unless trying to slow down the footage. In that case, if your camera can shoot faster (120 or 240 or even higher), you will get even better slow-motion effects. 1080×1920 is fine if you are not processing the video, but it can dramatically increase processing time, especially if you add things like video greenscreen or other effects.


However, this is dependent on the type of camera you have, so check for suitability first before you configure your camera. 

Optimal DSLR Video Setting for Specialty Situations

Taking great videos with a DSLR is easy, provided you can find the right setting for each situation. Most people take plain, green screen or slow-motion videos. If you fall into any one of these categories, here’s how to adjust your settings;

Slow motion video

To capture Slow Motion Video, Generally, you want to use the highest frame rate that you have available on your camera and that you have enough light for.  Some cameras have a specific “high frame rate mode” that must be enabled for access to these frame rates.

If you capture slow-motion video with a DSLR, go for 1280×720 at 60 fps. The other option is 1280×720 at 120 fps. Remember that using higher frames per second will automatically increase your shutter speed. It is impossible to keep your shutter open longer than the time your frame is recorded, so you need to compensate with more light on your guest and background and/or higher exposure in your other settings.

Light painting

For this use case, switch Tv to bulb, set Av at 8, and have ISO at 200. These settings may need to be adjusted depending on the effect you are trying to achieve

Final Take

The best thing you can do as a photo booth operator is to take a camera out into the world and shoot as much as you can with as many different settings as you can.  Be creative and become more familiar with how these different settings change the look of each photo you take.  Take multiple photos of the same subject with different settings and see how the feel of the image changes as you do so.  The more you become comfortable with making these changes the more you will be able to control and get exactly the look you want from your booth when you are on site!

Need some More help?

Struggling with your camera settings? Support has your back with a Camera Settings Knowledgebase Article

Share:

Facebook
Twitter
Pinterest
LinkedIn
News

Related Posts

Go Shawty, It’s your Birthday

You will need a free Photo Party Upload account to access Virtual Booth. Once you’ve created your account, return to this page to complete the sign up process.

Already set up on Photo Party Upload? Watch this short video on how to get started.

Play Video
0

Your Cart